Friday 27 February 2015

snLibrary - FileUploader

snLibrary - FileUploader
(v14.0 dtd. 22-Feb-2012)


When we create forms where we need to upload files to the server from the client side, the following input tag is used.

<html> <head> <title>File Uploading Form</title> </head>
   
 <body> 
   
<h3>File Upload:</h3> Select a file to upload: <br /> 
   
<form action="UploadServlet" method="post" enctype="multipart/form-data">
 <INPUT type="file" name="myfileforUpload" size="50" />
 <br />
 <input type="submit" value="Upload File" />
 </form> 
   
</body> </html>

In the servlet / jsp code, the following can be used.
File:- UploadServlet.java
import servlets.uploader.snUploader;
  
   snUploader snUpld = new snUploader();
             DataInputStream dataStream = new DataInputStream(snUpld.snGetUploadedFileItem(request, 
                                                                            "myfileforUpload").getInputStream());
   //     - or simply -
   DataInputStream dataStream = snUpld.snGetUploadedFileDataStream(request,  
                                                                    "myfileforUpload");
   BufferedReader buffReader = new BufferedReader(new InputStreamReader(dataStream, 
                                                                     "UTF-8"));
   for (String line; (line = buffReader.readLine()) != null;) {
        out.println(line + "<br/>\n"); 
        /// Some processing of the input file
   }


snLibrary - with LDAP / Active-Directory

snLibrary - with LDAP / Active-Directory

Probably it was sometime in 2011 that I started some work the Active Directory - though I had earlier conducted some experiments with LDAP of Lotus Domino for Java application interfacing.

I will now narrate some useful methods that you would like to implement for connecting to any LDAP (even Active Directory). 

Create a new folder under c:/snConfig by name LDAP.  Make an entry in the snConfigFile as follows.

File:- c:/snConfig/snConfigMyApplication.ini
LDAP Interface Configuration File=c:/snConfig/LDAP/snLDAPCfg.ini

Create the specified LDAP-InterfaceCfgFile c:/snConfig/LDAP/snLDAPCfg.ini as follows.
File:- c:/snConfig/LDAP/snLDAPCfg.ini 
No. of LDAP Servers=2

0-Initial Context Factory=com.sun.jndi.ldap.LdapCtxFactory  
0-Base Name=DC=DS,DC=INDIANOIL,DC=IN   
0-Search Filter=(&(objectClass=user)(userPrincipalName=*#{USER}*))  
#   Note:-  #{USER} keyword would be replaced by the UserName passed while calling the appropriate method.  
0-Return Attributes=sn, name, givenName, title, description, displayName, mail, designation, department
0-Provider URL=ldap://dcmkho1.ds.indianoil.in:389 
#0-Provider URL=ldap://dcmkho1.ds.indianoil.in:636  
0-Security Authentication=simple  
0-Domain=DS.INDIANOIL.IN 
#0-Service User=00023569
0-Service User=serviceuser  
0-Service Passwd=**********   
#0-Security Protocol=ssl  
0-Id ShortName=sn  
0-Id UserName=uid  
0-Id DisplayName=displayName  
0-Id Designation=title  
0-Id Department=department  
0-Id Mail=mail  

1-Initial Context Factory=com.sun.jndi.ldap.LdapCtxFactory  
1-Base Name=DC=DS,DC=INDIANOIL,DC=IN   
1-Search Filter=(&(objectClass=user)(userPrincipalName=*#{USER}*))  
#   Note:-  #{USER} keyword would be replaced by the UserName passed while calling the appropriate method.  
1-Return Attributes=sn, name, givenName, title, description, displayName, mail, designation, department
1-Provider URL=ldap://dcmkho2.ds.indianoil.in:389 
#1-Provider URL=ldap://dcmkho2.ds.indianoil.in:636  
1-Security Authentication=simple  
1-Domain=DS.INDIANOIL.IN 
#1-Service User=00023569
1-Service User=serviceuser  
1-Service Passwd=**********   
#1-Security Protocol=ssl  
1-Id ShortName=sn  
1-Id UserName=uid  
1-Id DisplayName=displayName  
1-Id Designation=title  
1-Id Department=department  
1-Id Mail=mail  

The configuration given above assumes that there are two LDAP servers namely dcmkho1.ds.indianoil.in and dcmkho2.ds.indianoil.in (In this case, both happen to be Active Directory setup).  The rule is that the LDAP server is identified by the prefix number given viz. 0, 1 etc. The maximum number of servers is also mentioned herein so that it will not consider more entries beyond that.
Now to go into the Java Code, .....
File:- myLDAPexample.java
import java.util.concurrent.ConcurrentHashMap;
import connect.ldap.snLDAPConnector;
// ...
// ... Some part of the code goes here ...
// ...
    ConcurrentHashMap hT = new ConcurrentHashMap();
    
     int id = 1;   // Refer to the LDAP configuration named 1
    snLDAPConnector snLDAP = new snLDAPConnector(id); 
    /// id is say 0 or 1 or 2 as defined in the Configuration file
    hT = snLDAP.fetchUserAttributes("00023569");
    String shortname = (String)hT.get("sn"));
    String name = (String)hT.get("name"));
    String designation = (String)hT.get(snLDAP.getID_Designation(id)));
    String displayName = (String)hT.get(snLDAP.getID_DisplayName(id))); 
// ...
// ... Rest part of the code ....
// ...

Quite easy !! Isn't it?


snLibrary - Encryption & Decryption - Inter-Application Communication

snLibrary - Encryption & Decryption
(v10.2 dtd. 07-Dec-2010)

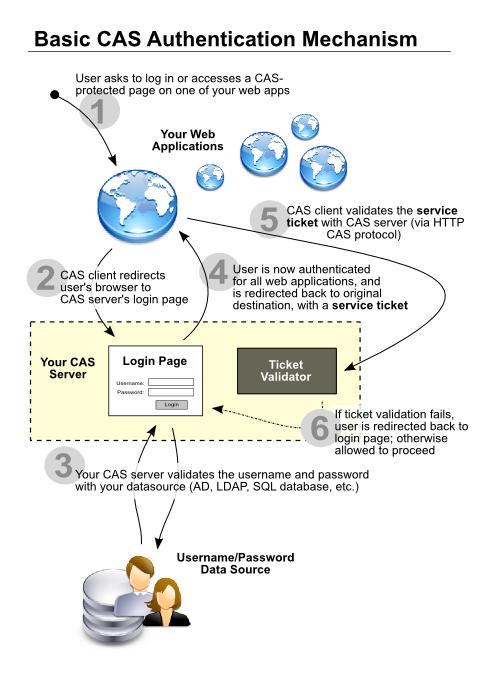
Until the advent of CAS (Central Authentication Service), authentication used to be done at the application level by prompting the user for a User-ID and a Password.  Those parameters are then compared with that stored in the database inorder to assertain whether or  not to allow the user to proceed with operating the application.

There are two methods of verification of password. For example.
Eg. 1:-
a. Obtain the password from the user
b. Verify whether the password entered is the same as that in the database table by comparing the obtained password with the decrypted password obtained from the table (assuming that the password has been stored in the encrypted form in the table).
c.  If the password entered and the password decrypted are the same, allow to proceed with the application; otherwise not.


Eg. 2:-
a. Obtain the password from the user.
b. Encrypt the password obtained from the user.
c. Verify whether the encrypted password entered is the same as that stored in the database table, by comparing both of them.
d. If the passwords match, allow to proceed with the application; otherwise not.

In my opinion, the second is the better method as it is more secure.  Further security can be ascertained by the following form of the SQL.
query = "SELECT userid, userpswd FROM USER_TABLE where userpswd = ?  and userid = ?";
pS = con.prepareStatement(query);

pS.setString(1, user_id);
pS.setString(2, snPassword.getInstance().encrypt(password));
pS.executeQuery();

Having obtained the result set after executing the SQL, once again verify the userid and userpswd with that obtained.
       if (userid.equals(rs.getString(1)) && userpswd.equals(rs.getString(2))) {
            // proceed further on with the application 
       } else {
          // throw Error in User Id / Password 
       }
It is advised to never use any of the following SQLs for application security reasons as they are prone to bugs/SQL injections:
query = "SELECT * FROM USER_TABLE WHERE userid = '" + user_id + "' and userpswd = '" + password + "'";

query = "SELECT 1 FROM USER_TABLE WHERE userid = '" + user_id + "' and userpswd = '" + password + "'";

query = "SELECT userpswd FROM USER_TABLE WHERE userid = '" + user_id + "' and userpswd = '" + password + "'";


snPassword.getInstance().encrypt(password) was specifically written incorporating base64 algorithm for encrypting a string.  However, the decryption is cumbersome and therefore, comparison of passwords are not made by decrypting the stored value of the password; rather is done by encrypting the input password using the same method and comparing the encrypted password with that stored in the database table.

For better standards, no decrypt method was provided in the snPassword class so that coders would it only as an ecrypting tool and not for decrypting.

However, later on (around Dec. 2010), requirement came in for having a decrypting algorithm.  I had in 1998 - 2000 an algorithm developed for an Imprest Module that was written in PowerBuilder and worked well.  Therefore, the same algorithm was copied into a new Java class called snEncryption.

This class provided encrypt() and decrypt() algorithms.  However, what I like most about this class is an additional feature that you might not see many-where!!.

The feature was developed in response to a requirement of communicating securely between applications on HTTP.  In the normal course, if we need to communicate between applications, say call an http page from one application to another, we could just pass it on creating a URL with the & delimiter joining the various parameters being passed.  How then, is it possible that the receiving application understands that the requesting URL is not arriving from any hacker trying to get some sensitive details?  In such a case, the following technique can be used.

This interesting feature can encrypt a URL with its parameters and send to another web-application.  The receiving web-application should have included a small filter inside its WEB-INF/web.xml that would ensure that the original parameters are received by the appropriate servlet. The feature is enriched by the fact that the life of the URL is not more than (default) 180 seconds.

Needless to say, that this methodology, can also be adopted as an internal security feature wherein, referring URLs within the same application could also be done with this alone.

Let me show you the implementation.
Dispatching Web Application:
File:-myURLDispatcher.jsp
<%@page import="config.snEncryption" %>
// ...
// ... Some part of the Servlet Code goes here 
// ...
<%
String param = "myparam1=First Param&myparam2=Second Param&noparam=No Param&userid=Kavya";
snEncryption snE = new snEncryption(param.length());
String encryptedParam = snE.encryptURLtoURLParam("NewServlet?", param, null, true);  
// Null is default value for UTF-8 encoding with default TTL (Time To Live) of 180 seconds
//            -or-
//  String encryptedParam = snE.encryptURLtoURLParam("NewServlet?", param, null, true, 120);  
// Last parameter indicates TTL of 120 seconds instead of default 180 seconds.
%>
  <form name=form1 method=get action=<%=encryptedParam%>  >
      <input type=submit value=Submit />
  </form>

Note:-  The NewServlet.java would use the request.getParameter("userid") to get the value "Kavya", use request.getParameter("myparam1")  to get the value "First Param" etc.  In other words, there is no need for decrypting the URL in the receiving servlet because, the decryption algorithm is taken care of by the Filter.

File:WEB-INF/web.xml 
<filter>
<filter-name>Induce Params Screen Approver</filter-name>
<filter-class>
org.sun.raibmanus.filters.snInduceParamsScreenApprover</filter-class>
    <init-param>
      <param-name>exclude_url-2</param-name>
      <param-value>/folder/index_[3-5].jsp</param-value>
    </init-param> 
    <init-param>
       <param-name>exclude_url-4</param-name>
       <param-value>([\w||\-||/])+\.([gG][iI][fF]|[pP][dD][fF]|[pP][nN][gG]|[jJ][pP][gG]|[jJ][pP][eE][gG]|[bB][mM][pP]|[jJ][sS]|[cC][sS][sS]|[sS][wW][fF]|[iI][cC][oO])</param-value>
    </init-param>        
    <init-param>
      <param-name>include_url-2</param-name>
      <param-value>/folder/index_4.jsp</param-value>
    </init-param> 
</filter>

<filter-mapping>
<filter-name>Induce Params Screen Approver</filter-name>
<url-pattern>/*</url-pattern>
</filter-mapping>


Apart from encryption, this filter also allows including in all the Http requests, persistent  request parameters that are stored in the snConfigFile.  For example, suppose the following should be a forced parameter in all requests of my web-application which I could use the getParameters() method to access, we may define them in the snConfigFile as below.
File:=c:/snConfig/snConfigMyApplication.ini
Persistent Request Parameter-name=Suresh Nambiar
Persistent Request Parameter-userid=Jack
Persistent Request Parameter-pwd=password233453
Persistent Request Parameter-Pwd=sureshpassword

What this means is that along with each and every request coming into the web-application server, the above four parameters would also get appended.  The four parameters in this case are 'name', 'userid', 'pwd' and 'Pwd'.

If org.sun.raibmanus.filters.snInduceParamsScreenApprover is used for the filter, the received parameters if any, are also included along with the Persistent Request Parameters.  Whereas in the case of org.sun.raibmanus.filters.snIncludeParamsFilter, no existing values other than those sent as encrypted using snEncryption..encryptURLtoURLParam() & the Persistent parameters are included. (org.sun.raibmanus.filters.snIncludeParamsFilter is deprecated.)

Yet another improved version (version 11.1 dtd. 24th Dec. 2010) has additional features viz. removing from response content, remove certain content types from the response text like patterns that contain 'xml', 'text', 'text/html' etc.  org.sun.raibmanus.filters.snInjectedParamsResponsePatternModifier can be used as the filter in-lieu of the above mentioned snIncludeParamsFilter.  

If the snInjectedParamsResponsePatternModifier is used, the filter shall be as follows:

File:-WEB-INF/web.xml 
<filter> 
<filter-name>Injected Params Response Pattern Modifier</filter-name>
<filter-class>org.sun.raibmanus.filters.snInjectedParamsResponsePatternModifier</filter-class>
<init-param>
<param-name>ModifyRequestQueryString</param-name>
<param-value>1</param-value>
</init-param>
<init-param>
<param-name>RemoveFromResponseContent</param-name>
<param-value>1</param-value>
</init-param>
<init-param>
<param-name>ContentTypeforRemoveResponse-1</param-name>
<param-value>text/html</param-value>
</init-param>
<init-param>
<param-name>ContentTypeforRemoveResponse-2</param-name>
<param-value>text</param-value>
</init-param>
<init-param>
<param-name>ContentTypeforRemoveResponse-3</param-name>
<param-value>xml</param-value>
</init-param>
</filter>

<filter-mapping>
<filter-name>Injected Params Response Pattern Modifier</filter-name>
<url-pattern>/*</url-pattern>
</filter-mapping>

And in the snConfigFile, the entry should be as follows:
File:- c:/snConfig/snConfigMyApplication.ini
Persistent Request Parameter-name=Suresh Nambiar
Persistent Request Parameter-userid=Jack
Persistent Request Parameter-pwd=password233453
Persistent Request Parameter-Pwd=sureshpassword

#Response Content Search Pattern=http//
#Response Content Search Pattern=viewer/viewframeset/
Response Content Search Pattern=.*

#Response Content Replace Pattern==[^&]*&?
#Response Content Replace Pattern==[a-e]*
Response Content Replace Pattern==[^&]*&?\s

Note that there can only one Content Search and Replace Pattern. Only the last valid entry (ie. without the starting # mark) would prevail.

With snLibrary version 11.1,  org.sun.raibmanus.filters.snIncludeParamsFilter,  org.sun.raibmanus.filters.snInduceParamsScreenApprover  etc. have been deprecated.

Note:- The 'Response Content Search Pattern' + 'Response Content Replace Pattern' work together and is operational if and only if RemoveFromResponseContent is set to 1 in the initparam. In which case, the response data is filtered and replaced by the pattern specified.

There is an incredible story behind providing this feature.  We had a reporting software called 'Actuate'.  It works on a Tomcat web-server providing compiled reports.  The required reports are compiled in the night and posted for ready availability giving the impression of a fast retrieval thereby improving user-experience.  For making the reports available to the internet, the Actuate server was put on NAT (Network Access Translation).  Once, it so happened that some('one') from the internet world (China or Korea...) hacked-in and deposited a bot into it.  It was then decided that some security needs to be improved on the Actuate server as it was exposed to Public IP addressing. Therefore, I suggested to put the Actuate server behind the reverse proxy and started exploring the source codes.  One day, I was examining the source of the response received from the Actuate server when to my surprise, found that the User-ID  as well as the password was being thrown down to each page as a hidden input field so that every further request could carry it along and get authenticated at the Actuate Server.  (Let me tell you, that day I was shocked to see the poor Code Quality that was unexpected but exhibited promptly, by well known and established Multi-National Companies like the one that was examined).  It was further surprising to find that it was the Admin user id with all authorities & rights along with its password for the Actuate Server that was so foolishly exposed and communicated as response data to the client!!.  I immediately alerted the team responsible for hosting the Actuate Server.  This has however, now resulted in a better configuration with the response being camouflaged (at least) to keep away not-so savvy ones from peeping into the Actuate Server - though definitely neither the amateur nor the experienced hackers.

I wanted to do something for this cause and therefore, included this specific Filter mentioned above that would pickup the user id and password from the Actuate Server itself (as Persistent Request Parameters) while not sending the values back to the client (by filtering them out through the 'Response Content Search Pattern' + 'Response Content Replace Pattern' combination).

The last part would ensure that you do get cleaner response data with some sort of filter applied.  Such are usually useful in AJAX responses and ensuring accuracy in or validating  the response at the server side itself.

Thursday 26 February 2015

snLibrary - Inducing External Values to avoid Hard Coding

snLibrary - Inducing External Values


One of the guiding principles that is part of the philosophy of 'snLibrary' is to maintain zero-hard-coding in application development.

I have many times noticed while web-application development, specific requirements of 'hard-coding' does come in which are hard to reject.  One such example would be the requirement to hard-code URLs or IP addresses or domain names of other servers or services that you need to put into the application code for URL re-direction or for providing hyperlinks. When such situation arises, what can we do?   The easiest method is either to 'hard-code'!! or save them up in a Java 'class' or 'interface' and implement them whenever needed.  But it would be at the cost that whenever there arises a request for change, you would need to modify the code and re-deploy in production.  Another method would be to set them up as context parameters in the web.xml and use it within the program.  Here again, whenever a change is required, the web-administrator would  need to actually extract the web.xml file out of the web-archive (.war) file and then modify and re-deploy the same.  This requires man-hours and technical expertise and careful handling. While in the tomcat environment this might be pretty easy, in JBoss or other environments and wherever exploding web archive file option is disabled, it would entail recompiling of the .war file.

Shall we avoid such extensive operations by any means?  Can snLibrary provide some solution?  This feature is available since version 22.2 dtd. 14-Feb-2015.

The following methodology can be used as a solution to the above problem.

Let us assume that we need to specify certain variables (or say constants - in this case) that needs to form prefix to few hyperlinks that your application would refer to.  Let us define the variable names as http.1, http.2, http.3, http.4, http.5, http.6.  (Needless to mention that the name of the variable/constant could be anything of your choice - say it could be alpha, beta, gama or say main.background-color, main.foreground-color etc.).  Another variable called 'defaultLanguage' is also mentioned for better understanding.

File:-c:/snConfig/snConfigMyApplication.ini
External Variable-http.1=http://10.34.133.216:8084/TimeAttendanceNew
External Variable-http.2=http://10.75.132.31
External Variable-http.3=http://10.34.132.119
External Variable-http.4=http://10.75.132.30:8080
External Variable-http.5=http://10.18.64.84
External Variable-http.6=http://10.75.132.15
External Variable-defaultLanguage=Hindi

 In the Java code, we could refer these variables/constants as follows:
File:- someJavaCode.java
import config.snConfigVars; 
// ...
// .. Some part of code goes here....
// ..
snConfigVars V = snConfigVars.getInstance();
String urlMypath = V.getExternalVariable("http.4", "");
// Thus 'urlMypath' would contain the value 'http://10.75.132.30:8080'

String lang = V.getExternalVariable("defaultLanguage", "English"); 
// Here, 'lang' would contain the value 'Hindi'.  In case, the variable was not provided in snConfigFile, it would have taken it as 'English' for default.

String bkg_color = V.getExternalVariable("main.background-color", "#FFFF");
// Thus the value of bkg_color would be #FFFF since no value has been specified in the snConfigFile.

Having found this very useful, I would rather also use it to create some other features - say create a web-page which is language sensitive.  For this, I could define as follows:-

File:-c:/snConfig/snConfigMyApplication.ini
External Variable-defaultLanguage=hi
#External Variable-mainpage.name.en=Name
#External Variable-mainpage.age.en=Age
#External Variable-mainpage.dob.en=Date of Birth
#External Variable-mainpage.addr.en=Address
External Variable-mainpage.name.hi=नाम
External Variable-mainpage.age.hi=आयु
External Variable-mainpage.dob.hi=जन्म तिथि
External Variable-mainpage.addr.hi=पता

And in the mainpage,jsp, the form could be something as follows.

File:-mainpage.jsp
<%@page contentType="text/html" pageEncoding="UTF-8"%>
<%@page import="config.snConfigVars" %>
<%
snConfigVars V = snConfigVars.getInstance();
String lang = V.getExternalVariable("defaultLanguage", "en"); 
%>
<html>
<body>
<form action="nextpage.jsp">
    <table border='0'>

    <tr><td> <%= V.getExternalVariable("mainpage.name." + lang, "Name")%> 
    </td><td> <input name="username" type="text" />
    </td></tr>

    <tr><td> <%= V.getExternalVariable("mainpage.age." + lang, "Age")%> 
    </td><td> <input name="age" type="text" />
    </td></tr>

    <tr><td> <%= V.getExternalVariable("mainpage.dob." + lang, "Date of Birth")%> 
    </td><td> <input name="d_o_b" type="text" />
    </td></tr>

    <tr><td> <%= V.getExternalVariable("mainpage.addr." + lang, "Address")%> 
    </td><td> <input name="addr" type="text" />
    </td></tr>

    </table>
     <input type="submit" name="Submit" value="Submit" />
</form>
</body>
</html>

Better still, if it was a case of Language properties, it could also be in an external properties file.  In that case, it could be mentioned in the snConfigFile as follows and we can move all the definitions of external variables into the external file.

File:-c:/snConfig/snConfigMyApplication.ini
External Variable Properties File=c:/snConfig/snExternalVariablesProperties.properties

File:-c:/snConfig/snExternalVariablesProperties.properties
defaultLanguage=hi

mainpage.name.en=Name
mainpage.name.hi=नाम
mainpage.name.sn=नाम: 

mainpage.age.en=Age
mainpage.age.hi=उम्र
mainpage.age.sn=आयु:

mainpage.dob.en=Date of Birth
mainpage.dob.hi=जनम दिन
mainpage.dob.sn=जन्म दिनाङ्कः

mainpage.addr.en=Address
mainpage.addr.hi=पता
mainpage.addr.sn=सङ्केत:


Wednesday 25 February 2015

snLibrary - Securing your Web-Application

snLibrary - Securing your Web-Application

While connection pooling is one aspect of a healthy application, as you would have already seen in my earlier blog,  can we have a simple method for some sort of Application Authentication security?  Certainly yes.  If so, is it possible to achieve this with very little code?.

Can snLibrary help? 

As we all know, application authenticity is established by way of challenging a user to authenticate himself/herself at the time of login.  Once he/she logs in to the application, the web-container maintains a unique session for the link between the user and the application.  As a keen observer, you would have often seen for yourself sometime during your childhood when you copied and pasted a URL (that was verily displayed on the address bar of your lovely browser) onto another browser or otherwise copied it and sent to your friend by email.  And Lo!! have you not many times become very happy seeing that the page opened before you just as it would have, had you actually gone through the tiring process of Login to the application?  If such an action did work perfectly well, then I would rather say that this certainly was (at least if it wasn't published intentionally), a poor programmer who did bad coding. 

As an intelligent coder, you would certainly want to get out of such misadventure, if at all any time you experienced such a 'fault' in your own code (which are those rare events when you wanted to hide yourself from being laughed at!!).   Some of you might have instructed your coders to put a line of code for verification in each of the web-page, wherein each JSP page would be verified for a session attribute, say user-id or so, before actually letting the code display the web-page. Yes indeed - let me also acknowledge that it is the right way!!. However, as it is often said, there is a lot between theory and practice.  We have already seen that in theory we always would like our code to open and close all database connections in each page - but does that happen in practice?  The answer is:- many times not.  (Needless to say, many times while your coders would have done the verification in each web-page, they would have forgotten to put in the servlets or at least otherwise in those AJAX (Asynchronous Java And XML) called codes).

To overcome this, a small feature was provided in the snLibrary (since Ver-10.0 dtd. 20th Aug. 2010) which I named it the Indirect entry Redirection option.  It means that if per chance, someone tries to access any page through 'indirect' means!!,  then it would be redirected to the so called 'login' page. Such a feature can be implemented as follows.

Let us assume that there is one Login page and a Validation page/servlet.  The Login page would be usually the welcome page of the Web-application (defined under the welcome tags of web.xml).  Often, it is the page called 'index.jsp' or 'index.html' or any other that is defined in the web.xml under the 'welcome' tag.  The Login page could be the one that would accept the user-id and password.  Having accepted the credentials of the user, it would pass on to the Validation page. The validation page would validate and then if the credentials were acceptable, would proceed to other pages; otherwise take it back to the Login page (often with an error message). 

User ------>  Login.jsp ---> Validate.jsp -- if OK ----> ApplicationMainPage.jsp
User ------>  Login.jsp ---> Validate.jsp -- if NOT OK ----> Login.jsp
                                 
However, there could be other pages which as a programmer you would wish to intentionally leave open without requiring to be authenticated as well.  Such cases can be put in the 'exclusion' pattern list.

Thus we have three parameters namely:-  the login page which I shall call the 'default_url',  the validation page which I shall call the 'validator_url' and one or more pages that do not require any authentication (viz. the .bmp, .js, .css, .png, .gif, .jpg etc.) which I shall call the 'exclude_url-nnn'.  These three patterns are defined as parameters in the web.xml under 'Indirect Entry Redirection Filter'. Include the following in the web.xml file. 

File:- WEB-INF/web.xml
  <filter>
    <filter-name>Indirect Entry Redirection Filter</filter-name>
    <filter-class>sessions.snIndirectEntryRedirectorFilter</filter-class>
    <init-param>
      <param-name>default_url</param-name>
      <param-value>login.jsp</param-value>
    </init-param>
    <init-param>
      <param-name>validator_url</param-name>
      <param-value>login_validate.jsp</param-value>
    </init-param>  
    <init-param>
      <param-name>exclude_url-1</param-name>
      <param-value>index_2.jsp</param-value>
    </init-param>
 <!-- Any webpage starting with /myfolder/index_, following with 3, 4 or 5 followed by a character and then jsp -->
    <init-param>
      <param-name>exclude_url-2</param-name>
      <param-value>myfolder/index_[3-5].jsp</param-value>
    </init-param>        
<!--  Webpage starting with /myfolder/index_4.jsp, even though excluded by /myfolder/index_[3-5].jsp would get included -->
    <init-param>
      <param-name>include_url-2</param-name>
      <param-value>myfolder/index_4.jsp</param-value>
    </init-param> 
<!-- Any word-character or dash (-) or slash (/) any number of times with extension gif,pdf,jpg etc.  -->
    <init-param>
      <param-name>exclude_url-3</param-name>
      <param-value>([\w||\-||/])+\.(gif|pdf|png|jpg|jpeg|bmp|js|css|swf|ico)</param-value>
    </init-param>       
<!-- Any word-character or dash (-) or slash (/) any number of times with extension GIF,PDF,PNG,JPG etc.  -->
    <init-param>
      <param-name>exclude_url-4</param-name>
      <param-value>([\w||\-||/])+\.([gG][iI][fF]|[pP][dD][fF]|[pP][nN][gG]|[jJ][pP][gG]|[jJ][pP][eE][gG]|[bB][mM][pP]|[jJ][sS]|[cC][sS][sS]|[sS][wW][fF]|[iI][cC][oO])</param-value>
    </init-param>       
  </filter>
  
  <filter-mapping>
    <filter-name>Indirect Entry Redirection Filter</filter-name>
    <url-pattern>/*</url-pattern>
  </filter-mapping>  


 For this to work, there is just one more code to be put in the VALIDATED='TRUE' condition of the validator_url which is given below:-

File:-login_validate.jsp
import sessions.snAuthentications;
// ....
// ....
// ... Some part of the code goes here inside the Validate.jsp 
// ...
   if (valid_user_id) { 
        snAuthentications.properlyLoggedIn(request, response);
        // ...
        // ... Some other part of the code 
       // ....
   }
// ....
// ... Some other part of the code goes here 
// ...


Tuesday 24 February 2015

snLibrary with Jasig CAS (v9.0 11 Aug 2010)

snLibrary with Jasig CAS

We all know that the implementation of Central Authentication System (CAS) by JASIG is one of the most popular ones thanks to its simplicity and ease of implementation. 

When many web applications started mushrooming, the next necessity that evolved might not be by design but by desire was CAS as a means for Single Sign-On to all those small and big web-applications.

After a few days of R&D on different methods of Single Sign-On, I came across Jasig-CAS.  Later on, I found that an easy & simple implementation of the Jasig Server was the RubyCAS (https://rubycas.github.io/) by Matt Zukowski.  Though I was not well versed in Ruby, I had heard about it and had a few encounters with it while implementing SSMS (Servo Stockist Management System) a miniERP which we got developed through outsourcing.  The simplicity of the language and the enormous potential it has for the future gives me goose-bumps (or should I say porcupine bumps!!).
Basic CAS Single Sign-On Diagram
But what has snLibrary got to do with CAS implementation since JASIG CAS implementation is fairly straightforward and simple??.

My little experience in software development &testing drove me to implementing a facility even for CAS.  The requirement was that as a developer, I should not be required to be actually authenticated to the domain during that phase.  For instance, many of the developers could be some outsourced men/women who needn't have to be provided with userid/passwords of our employees.

Thus it was indeed necessary that by a setting a flag in the configuration file, I should be able to manage the login.  Thus, was implemented the method:- 'isCASenabled()' in the snLibrary.  This would check whether CAS is to be effected for the implementation of the web-application.
However, in the production site, the snConfigFile contained 'CAS Enabled=1' so that the application security could be taken care.

Few other additional parameters were also included for session time out and for redirecting upon logout.

File:-c:/snConfig/snConfigMyApplication.ini
CAS Enabled=1
CAS Config Properties File Name=c:/snConfig/SSO/snCASCfg.ini
Home URL=http://spandan.indianoil.co.in/myApplication/

File:-c:/snConfig/SSO/snCASCfg.ini
CAS-Server URL Prefix=JaanasiMaamVaa
CAS-Server Login Servlet=login
CAS-Server Logout Servlet=logout

CAS-Server Logout Service Parameter=/?service=
CAS-Server Logout Default Home URL=http://www.indianoil.co.in

Web-Server Protocol Prefix=http://
Web-Server Host Address=localhost
Web-Server Port=8084

#CAS-Server Protocol Prefix=http://
#CAS-Server Host Address=10.146.64.153
#CAS-Server Port=8080

CAS-Server Protocol Prefix=http://
CAS-Server Host Address=spandan.indianoil.co.in
CAS-Server Port=

In case of SSL configuration, the same could be as follows:-
File:-c:/snConfig/SSO/snCASCfg.ini
CAS-Server Logout Service Parameter=?service=
CAS-Server Logout Default Home URL=http://www.indianoil.co.in

CAS-Server Protocol Prefix=https://
CAS-Server Host Address=spandan.indianoil.co.in
CAS-Server Port=

CAS-Server URL Prefix=JaanasiMaamVaa
CAS-Server Login Servlet=login
CAS-Server Logout Servlet=logout

Web-Server Protocol Prefix=http://
Web-Server Host Address=10.146.65.10
Web-Server Port=80

Needless to say, the standard filter for the web.xml for Jasig-CAS remains the same and would be something as follows:
File:-WEB-INF/web.xml 
  <!--
  <filter>
      <filter-name>CAS Authentication Filter</filter-name>
      <filter-class>org.jasig.cas.client.authentication.AuthenticationFilter</filter-class>
      <init-param>
          <param-name>casServerLoginUrl</param-name>
          <param-value>http://webapp.indianoil.co.in/JaanasiMaamVaa/login</param-value>
      </init-param>
      <init-param>
          <param-name>serverName</param-name>
          <param-value>http://localhost:8084</param-value>
      </init-param>
  </filter>
  <filter>
      <filter-name>CAS Validation Filter</filter-name>
      <filter-class>org.jasig.cas.client.validation.Cas10TicketValidationFilter</filter-class>
      <init-param>
          <param-name>casServerUrlPrefix</param-name>
          <param-value>http://webapp.indianoil.co.in/JaanasiMaamVaa/</param-value>
      </init-param>
      <init-param>
          <param-name>serverName</param-name>
          <param-value>http://localhost:8084</param-value>
      </init-param>
      <init-param>
          <param-name>redirectAfterValidation</param-name>
          <param-value>true</param-value>
      </init-param>
  </filter>
  <filter>
      <filter-name>CAS HttpServletRequest Wrapper Filter</filter-name>
      <filter-class>org.jasig.cas.client.util.HttpServletRequestWrapperFilter</filter-class>
  </filter>
  <filter-mapping>
      <filter-name>CAS Authentication Filter</filter-name>
      <url-pattern>/*</url-pattern>
  </filter-mapping>
  <filter-mapping>
      <filter-name>CAS Validation Filter</filter-name>
      <url-pattern>/*</url-pattern>
  </filter-mapping>
  <filter-mapping>
      <filter-name>CAS HttpServletRequest Wrapper Filter</filter-name>
      <url-pattern>/*</url-pattern>
  </filter-mapping>
  -->

In the implementation of the source-code, the following would be of guidance. 
File:-ValidateUser.java
import sessions.snAuthentications;
import config.snConfigVars;

// ... Some code goes here ...

  snConfigVars V = snConfigVars.getInstance();

  if (V.isCASenabled()) {
    //String authIdStr = request.getUserPrincipal().getName();
    String authIdStr = snAuthentications.getAuthenticationId_Numeric(request);
    try {
      authId = Integer.parseInt(authIdStr);
    } catch (Exception ee) {
      authId = 0;
    }
  }
 if (authId > 0) {
    GlobalVariables GV = new GlobalVariables();
    //String uid = null;
    //uid = Long.toString(authId);
    hV = (Hashtable) session.getAttribute(GV.JGURUJI);
    if (hV == null) {
      JGUser user = new JGUser(authId);  // Create a User Class from the authId.
      if (user != null) {
        hV = new Hashtable();
        session.setAttribute(GV.JGURUJI, hV);
        hV.put(GV.USER, user);
        //logger.info("");
        log.info("User: {} {}", authId, " Successfully Logged in.");
        successLogin = true;
      } else {
        successLogin = false;
        session.removeAttribute(GV.JGURUJI);
        log.info("User: {} {}", authId, " Login Failed.");
      }
    }
  }
  String forwardURL = "error.jsp";
  if (!successLogin || hV == null) {
    RequestDispatcher rd = request.getRequestDispatcher(forwardURL);
    if (rd != null) {
      rd.forward(request, response);
    }
  } else {
     if (successLogin) {
          snAuthentications.properlyLoggedIn(request, response);
     }
  }

And this is what you would get for the Single Sign-On !!. 


I had initially used the following codelet for the login page so that it was possible to have a separate authentication route for the developer/tester and another for the tester/end-user.  Here, if CAS was set to be enabled, then it would use the CAS credentials.  However, if otherwise, then it would throw up a Challenge screen for Authentication through the login page.

<%@ page import="config.snConfigVars" import="sessions.snAuthentications" %>
// ...
// ...  Some HTML page code goes here....
// ...
<form action='validate.jsp'   method='POST' >
<table >
      <%
      String user_id = "";
      snConfigVars V = snConfigVars.getInstance();
      long authId = 0L;
      if (V.isCASenabled()) {
        user_id = (new snAuthentications()).getAuthenticationId_Numeric(request);
        try {
          authId = Long.parseLong(user_id);
        } catch (Exception ee) {
          authId = 0L;
        }
      }
      if (authId > 0) {
      %>
      <input name="user_id" type="hidden" id="user_id"  value="<%=authId %>" size="15" maxlength="10">
      <input name="passwd" type="hidden" id="passwd"  value="snpassword" size="15" maxlength="15">
      <% 
      } else {
    
%>
    <tr valign="top"> 
      <td width="20%" bgcolor="#F0F0F0"> <div align="right"><font size="2" face="Verdana, Arial, Helvetica, sans-serif">User ID :</font></div></td>
      <td width="29%" bgcolor="#F0F0F0"> <input name="user_id" type="text" id="user_id" size="15" maxlength="10"></td>
    </tr>
    <tr valign="top"> 
      <td bgcolor="#F0F0F0"> <div align="right"><font size="2" face="Verdana, Arial, Helvetica, sans-serif">Password 
          :</font></div></td>
      <td bgcolor="#F0F0F0"> <input name="passwd" type="password" id="passwd" size="15" maxlength="15"></td>
    </tr>
      <%
      }
      %>
<tr><td>
<input name="submit" type="submit" value="<%=(authId > 0) ? "Continue" : "Submit"%>" />
</td></tr>
</table>
</form>

And further inside the validate.jsp, you can validate the authId only if CAS is not enabled (using isCASenabled() method).


snLibrary - Emailing & SMS (v6.0 - 14th Dec 2008)

snLibrary :- Emailing


History:
It was during 2007-08 that we faced lot of network issues at our old data-centre.  Those days, we had a mailing software from IBM called Lotus-Domino.  Domino was a pretty simple and sturdy mailing solution on Linux platform.  However, frequent network failures (we had very old 3-Com switches at that time), with the advent of new web-applications that demanded emailing from within them, put heavy load on the SMTP (Simple Mail Transfer Protocol) server of Lotus Domino and it was found that many a time, emails did not get transferred.  The emails sent from programs did not get any response either causing many programs to go into 'hang' state.

Enough attempts were made to flag the issue for resolution, but in vain.  The network team was also helpless because, hardware procurement and network re-cabling was very time consuming - and not until 2010-11 or so could we actually procure good quality switches and complete the massive re-cabling exercise.

The issue turned severe with the launch of eCFS (electronic Customer Feedback System) and some solution had to be found.  Given the situation of crisis, was born the snSendMail class of snLibrary.  In this blog we will discuss the same.

I suggested (and got a small award as well !!)  that we could do a Buffered Multi-threaded Ensuring Email Dispatch system, that would initially store/stage the requested email in a database table and thereafter frequently try sending them in a scheduled manner to the Lotus Domino's-SMTP server.  This was a great success at that time.  The snSendEMail / snSendMail classes were included in the snLibrary (on 14-Dec-2008 in version 6.0).


Send an Email

Implementation:-
I will therefore explain the implementation methodology.  It should be understood that the methods have the feature for sending without buffering.  In case where there is an attachment, it actually does only direct sending without buffering using the database table.

Create a file (snMailmyApp.ini) inside the mail folder of snConfigFile folder with the following entries.
File:- c:/snConfig/mail/snMailmyApp.ini
mail intranet prefix=http://webapp.indianoil.co.in/myapp/
mail internet prefix=http://webapp.indianoil.co.in/myapp/

#mail host=10.146.64.200
#mail port=25
#mailer=smtpsend
#mail user=hohrd@indianoil.co.in
##mail pass=
#Verbose=true
#SMTP Auth=false
#Debug=true
#SSL=false

#mail host=smtp.gmail.com
#mail port=465
#mailer=smtpsend
#mail from=hohrd@indianoil.co.in
##mail from=indianoil.mktg.ho@gmail.com
#mail user=indianoil.mktg.ho
#mail pass=
#Verbose=true
#SMTP Auth=true
#Debug=true
#SSL=true

#mail host=10.146.64.80
#mail port=25
#mailer=smtpsend
#mail user=hohrd@indianoil.co.in
#mail pass=
#Verbose=true
#SMTP Auth=false
#Debug=true
#SSL=false

#mail host=10.146.64.173
mail port=25
mailer=smtpsend
#mail user=hohrd@indianoil.in
mail pass=
Verbose=true
SMTP Auth=false
Debug=true
SSL=false

mail from=e_suggestion@indianoil.in

mail user=hohrd@indianoil.co.in

mail host=mkhoexht.ds.indianoil.in

Send Mail Via WebService=false

Send Mail Via Staging Database=false

#Staging Database Insert SQL=insert into SMTPStagingDB.newEmails (created_by, mail_host, mailer, user, passwd,debug, verbose, auth_required, use_SSL, mail_from, mail_to, mail_cc, mail_bcc, mail_subject, mail_text) values ( ?, ?, ?, ?, ?, ?, ?, ?, ?, ?, ?, ?, ?, ?, ?)

Staging Database Insert SQL=insert into newEmails (CREATED_BY, MAIL_HOST, MAILER, USERID, PASSWD, DEBUG_ON, VERBOSE_ON, AUTH_REQUIRED, USE_SSL, MAIL_FROM, MAIL_REPLY_TO, MAIL_TO, MAIL_CC, MAIL_BCC, MAIL_SUBJECT, MAIL_TEXT, YYYYMMDD, CREATED_ON, UPDATE_FLAG) VALUES (?, ?, ?, ?, ?,   ?, ?, ?, ?, ?,   ?, ?, ?  , ?, ?, ?, to_char(SYSDATE,'YYYYMMDD'), SYSDATE, 'A')

For the purpose of connecting to the database, we need to provide the Connection parameters in an external file.  We can give this in the following manner.
File:- c:/snConfig/ConnEmailDB.xml
<?xml version="1.0" encoding="UTF-8"?>
<!DOCTYPE properties SYSTEM "http://java.sun.com/dtd/properties.dtd">
<properties>
<entry key="Name">EmailDB</entry>
<entry key="DataBase Type">Oracle</entry>
<entry key="Driver">oracle.jdbc.driver.OracleDriver</entry>
<entry key="validation">SELECT 1 from dual</entry>

<entry key="Max Active Connections">10</entry>
<entry key="Max Idle Connections">5</entry>
<entry key="Min Idle Milliseconds for Statement Eviction">0</entry>
<entry key="Max Wait Milliseconds until New Connection">0</entry>
<entry key="Max Active Statements">0</entry>
<entry key="Max Idle Statements">0</entry>

<entry key="Load Database Pool on Startup">true</entry>

<entry key="login">email</entry>
<entry key="pass">email_pswd</entry>
<entry key="JDBCurl">jdbc:oracle:thin:@10.146.64.73:1521:tranDB</entry>
</properties>

Now insert the following line in the snConfigFile of the application as given below.
File:- c:/snConfig/snConfigMyApplication.ini
MailConfigFileName=c:/snConfig/mail/snMailmyApp.ini
DataBase Connection Properties XML File Name for Emailing=c:/snConfig/mail/ConnEmailDB.xml


How can I send an Email?
Having made these updates in the respective files, we will now see how this can be implemented in a Java program.  Firstly we will assume that we have set Buffered emailing feature to false. (ie. we will assume that we have set the 'Send Mail Via Staging Database' option to false.
A sample java code for emailing is given below:-
import org.slf4j.Logger;
import org.slf4j.LoggerFactory;
import config.log.LogErrorWriter;
import utils.snSendEMail;

public class myClassA {
// ..... some code of the program....

   //Logger logger = LoggerFactory.getLogger(this.getServletName() + ".class");
   Logger logger = LoggerFactory.getLogger(myClassA.class);
   LogErrorWriter lew = new LogErrorWriter(logger);

   snSendEMail snM = new snSendEMail();
   
   // ...
   // Define the variables and set appropriate values .......
   // ...
   
   if (lew.writeEmailInfo(snM.snSendEMail(send_to, "","", emailSubj, emailStr),
                  logger, send_to, emailSubj, emailStr)) {
        emailedToList += " [" + send_to + "] ";
   }
   // ....
   logger.info("Emails have been sent to : {}", emailedToList); 
   // ....

//  some part of the program
}

The above codelet would automatically take care of sending the email based on whether or not the configuration setting is for Buffered-Multi-threaded Email Dispatch or through direct SMTP call. Hence the developer need not be worried about how it would get implemented in the Production System - whether it would be through the database, direct SMTP or through web-services calls - Rest Assured, that it works well!!

You may also wish to explore other methods of the snSendEMail class wherein you could specify the from id, attach files, send the message in an HTML / Text format (- text is default) etc.

It may also be noted that it is possible to pass a Config File as part of parameterized constructor
   snSendEMail snM = new snSendEMail(configFileName);


Send an SMS

How can I send an SMS?
Now that you have seen how to send Emails, Sending SMS is just as easy and on very similar lines. The following code is for sending SMS via DatabaseTables.

import org.slf4j.Logger;
import org.slf4j.LoggerFactory;
import config.log.LogErrorWriter;
import utils.snSendSMS;

// ...
// Some part of the code runs here ....
// ...
                  Logger logger = LoggerFactory.getLogger(this.getServletName() + ".class");
                  LogErrorWriter lew = new LogErrorWriter(logger);

                  snSendSMS snSMS = new snSendSMS();

                 //SMSObject smsObj = new SMSObject();
                 //snSMS.setInsertSQL(smsObj.getInsertSQL());
                 //snSMS.setSMSData(smsObj.getColumnObjectValues(sms_mobile, smsStr, ""));
                 
                 Object[] smsObject = {sms_mobile, smsStr, createdBy};
                 snSMS.setSMSData(smsObject);
                 lew.writeSMSInfo((0 < snSMS.sendSMS("SMS")), logger, sms_mobile, smsStr, "");

// ...
// Some part of the code runs here ....
// ...

File:- c:/snConfig/snConfigMyApplication.ini
SMSConfigFileName=c:/snConfig/sms/snSMSConfig.ini
DataBase Connection Properties XML File Name-SMS=c:/snConfig/ConnSMS.xml

File:-c:/snConfig/sms/snSMSConfig.ini
Send SMS Via WebService=false
SMS Insert SQL=insert into SMS_DETAILS VALUES (?, ?, ?, SYSDATE)


There is also code for sending SMS via Web-service (which has been tested and bug fixed as of version 26.0 dtd. 19.01.2016).  The list of configuration parameters for the same is given below:

import org.slf4j.Logger;
import org.slf4j.LoggerFactory; 
import utils.snSendSMS;

// ...
// Some part of the code runs here ....
// ...
                  Logger logger = LoggerFactory.getLogger(this.getServletName() + ".class"); 

                  snSendSMS snSMS = new snSendSMS(); 

//... sms_mobileNo_list is a comma separated (or as defined by the 
//             parameter "SMS MobileNo delimiter") list of Mobile Nos. 
//             Eg:- 9425013000,9876543210,9988776655
//... smsText is text limited to allowable characters of a text message thru SMS.

                 Object[] smsObject = {sms_mobileNo_list, smsText};
                 snSMS.setSMSData(smsObject);
                 int countOfSMSsent = snSMS.sendSMS("SMS");   
// May use snSMS.sendSMS(); if Staging DB is not being used or planned in future. 
// Only .ini file change would then be required.  

                  if (countOfSMSsent > 0) {
                      log.info("SMS to : {} against request id : {} sent. Count of SMSs = {}", new Object[]{smsObject[0], "" + reqId, "" + countOfSMSSent});
                  }

// ...
// Some part of the code runs here ....
// ...

File:- c:/snConfig/sms/snSMSConfig.ini

#--- If Send SMS Via WebService is true, then the application should have included 
# a Web-Service Client in the project itself.
# This can be done using the WSDL published for this purpose. 
# Contact your system administrator to get the correct Web-Service WSDL URL 
# Eg:- http://webapp.indianoil.co.in/IOCWebService/SMSAsService?wsdl 
  If no WebService has been included, the use of method would use SOAP over HTTP if the parameters are set to true in both cases. 
Send SMS Via WebService=true

Mobile-Number Length=10 
#User Id=paribhavam 
#Password=xxxxxx 
#Dept Id=19 
#Send Message as Flash=true 
#Message Type=MsgType 
#Message Validity in seconds=18600 
#Sender=IOCL 

Send using SOAP HTTP Template=true 
SMS SOAP Template File=c:/snConfig/sms/snSMSviaHTTP.xml 
SMS Gateway URL=http://sandesh.indianoil.co.in:80/IOCSMSGateway/SMSGateway 
SMS SMS Content-Type=text/xml; charset=utf-8

#SMS Object Mobile No. ordinal=0 
#SMS Object Message Text ordinal=1 
#SMS Object User Id ordinal=-1 
#SMS Object Password ordinal=-1 
#SMS Object Dept Id ordinal=-1 
#SMS Object Send Message as Flash ordinal=-1 
#SMS Object Message Type ordinal=-1 
#SMS Object Message Validity in seconds ordinal=-1 
#SMS Object Sender ordinal=-1 


#SMS Insert SQL SMS Insert SQL=insert into SMS_DETAILS VALUES (?, ?, ?, SYSDATE) 

Send SMS Copy to=9977455596,9977455596,9425013000
SMS via HTTP MobileNo Tag=<mobile_no></mobile_no>
SMS via HTTP SMS-Content Tag=<sms_content></sms_content>
SMS via HTTP Response Tag=<return>S</return>
SMS MobileNo delimiter=,

Split and send SMS=true


Sample SOAP Template file is given below.
File:- c:/snConfig/sms/snSMSviaHTTP.xml
<?xml version="1.0" encoding="utf-8" ?>
<soapenv:Envelope xmlns:soapenv="http://schemas.xmlsoap.org/soap/envelope/" xmlns:ioc="http://ioc/">
  <soapenv:Header/>
  <soapenv:Body>
  <ioc:OutGoingSMS>
    <mobile_no></mobile_no>
    <sms_content></sms_content>
    <sms_type>
ENG</sms_type>
    <userID>
SMSuser</userID>
    <password>
SMSpswd</password>
  </ioc:OutGoingSMS>
  </soapenv:Body>
</soapenv:Envelope>

Change the sms_type, userId, password etc. accordingly (including their values) as required.  The mobile_no, sms_content fields would be appropriately populated before sending. Note that there should not be any space between the open and the end tags of  mobile_no and sms_content.

(Note:- This code has been tested successfully as of Version 26.0 dtd. 20.01.2016)